Moleskine Reloaded
…or, How to Rebind a Moleskine Notebook :
Make a Custom DIY Sketchbook!
Table of Contents
| I. | Introduction | VI. | Punching | ![]() |
|
| II. | Stuff | VII. | Sewing | ||
| III. | Decisions | VIII. | Ripping | ||
| IV. | Cutting | IX. | Gluing | ||
| V. | Folding | X. | Finishing |
I. Introduction
The size and durability of the Moleskine Pocket notebook is perfect for my sketching needs, but the paper is not ideal. Although both “sketchbook” and “watercolor” versions are available, neither is well-suited to my particular requirements. And so, I have developed a process for replacing the paper (aka Moleskine Reloaded) while retaining all the other wonderful attributes of the Moleskine.
These instructions describe exactly how I do this process, but one can of course vary the project extensively to suit other notebook sizes, papers, or covers. The pages themselves are sewn together with a Coptic style binding. If you have never sewn a book before, don’t be scared off by this proposition. It is not as hard as it looks, really, and it’s a lot of fun.
My own reasons for the choices I‘ve made for my sketchbooks are:
- Moleskine notebook: Durable, interior pocket and elastic closure, nicely styled.
- Pocket Daily Planner style of Moleskine notebook: Small overall size (3.5 x 5.5 inches) is easy to take everywhere and encourages quick drawing, and thicker spine (1 inch) allows for more pages in the book.
- Watercolor paper: I mostly use ink lines with color washes and real watercolor paper greatly facilitates the wash process.
- Hot press paper: My pen glides easily on this (smooth) paper and it is a pleasure to draw on: it facilitates the line part of my process.
- 90 lb paper: This lightweight paper allows for more pages in a book.
- Fabriano Artistico paper – Folds well (doesn’t tend to crack as Arches does) and smells better when wet (than Arches does).
- Coptic binding: Durable, and allows book to open completely flat.
You may click on any of the photos or charts below to see a larger view. Now, let’s get started.
II. Stuff
Most of these materials can be found in a well-stocked art supply store, or online. Here is what you will need:
Materials:
- Moleskine: 1 Moleskine Daily Pocket Planner (3.5 x 5 x 1 inches). You can often get good deals on outdated versions after the new year.
- Paper: 2 full-size sheets (22″x30″), 90 lb paper. I use Fabriano Artistico Hot Press (available by the sheet).
- Thread: I use Lineco Linen Thread, but any heavy (“buttonhole” or “topstitching”) sewing thread will work fine.
- Glue: I use Lineco PVA, but any basic paper glue will work fine.
- Glue spreader: I use a disposable foam brush.
- Paint brush: I use a disposable foam brush.
- Black paint or ink: Nothing fancy needed, I use Golden Acrylic.
- Razor blade knife: like this or this, for example.
- Pencil
- Eraser
Tools:
- Scissors
- Needle: I use Lineco Book Sewing Needles, but any somewhat sharp needle that will accommodate your thread will do.
- Large Book (hardback or telephone book, for example)
Optional:
- Cloth ribbon (for a bookmark, if you want one and don’t want to reuse the Moleskine bookmark)
- T-Square (helpful for measuring the paper)
- Triangle 7 inches or larger (helpful for measuring paper)
- Paper clasps similar to these (helpful in the sewing process)
- Beeswax: Like this for example, if your thread is not pre-waxed (helpful in the sewing process).
- Corner punch 1/4-1/2 inch radius (for rounding page corners). I use a Small CornerAdorner
- Bone folder (or a metal spoon)
- 2 flat rubber bands, 2-4 inches in diameter
- Paper Trimmer
- Wax Paper or Parchment Paper (helpful for gluing)
- Paper Towels (for wiping excess glue)
III. Decisions
- Number of Signatures: Lets figure out how many signatures (sub-sections) you will be putting in your book. If you are going to use watercolor or collage in your book, plan on using 11 signatures. If you will be using dry media only (pen, pencil, etc.), you can use 12 signatures.The Daily Planner comes with a detachable address book in the back. Decide if you want to keep it or not. If you do, deduct one from the number of signatures you will be working with.Circle how many signatures you will be including:
10 11 12
- The Moleskines also come with a ribbon bookmark. Decide if you want to keep the bookmark, replace it with your own (more festive?) ribbon, or dispense with the bookmark altogether.
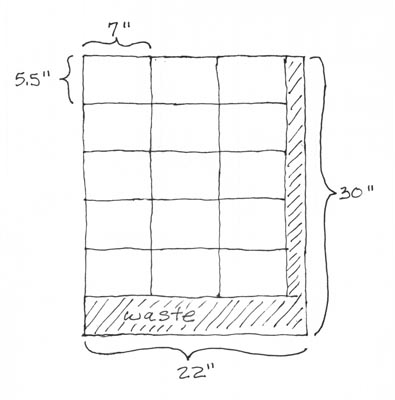
IV. Cutting
- Following the diagram below, measure and cut 15 pieces from each sheet of paper. This orientation will allow for best folding later as the paper will be folded with its grain.

Cut Sheets As Shown Measure carefully and ensure that your corners are square. I use a t-square and triangle on my coffee table to measure and mark three long 7″ wide strips, then I cut out the strips with scissors. The strips are further divided down to final size with my paper trimmer.
V. Folding
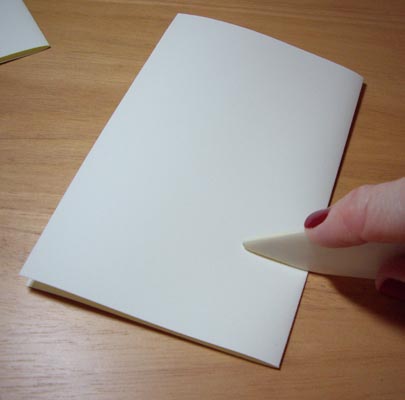
- Take 20 or 22 or 24 sheets (depending on whether you are making 10, 11, or 12 signatures, respectively) of the 7″ x 5.5″ sheets you just cut and fold each of them crosswise so that the resulting piece is 3.5″ by 5.5″. Be as accurate as you can, but don’t worry about some variation. Crease the fold with a bone folder or the back of a spoon, but don’t overdue it: crease should be firm but not knife-like.

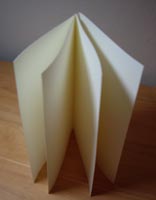
Creasing the Fold Pair up sheets by placing one folded sheet inside another to create sets. These sets are called “signatures” in book binding lingo.

One Signature
VI. Punching
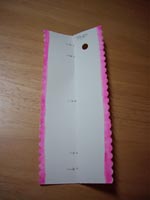
- Fold one of your remaining 5.5” x 7″ pieces of paper in half as you just did for the others. Cut lengthwise about 1 inch from the fold so that you have a V-shaped paper “trough”. We will make a punching guide from this piece. Measure and mark dots on the inside crease 1/2 inch from each end, 1 inch from each end, and 2.75 inches from one end (5 dots total). Using your needle, punch a hole through each dot right on the crease from the inside. Mark one end of your guide “top”. Optional: I like to use a marker to put some color along the edges opposite the fold so that I can see them easily against the book sheets later. I also punch a hole in one side of the guide so I can see what is underneath it.

Punching Guide - Punch 5 holes in each of your signatures as follows: Open a hardback book or phone book and seat the signature’s crease in the book’s crease. The book will serve as a cradle to steady your signature while you punch it. Place the guide on top of your signature carefully aligning both, and ensure that all sheets are well seated in the cradle. Use your needle to punch though each of the five guide holes and through the signature. Use a pencil to lightly mark the outside of each signature as to which end the guide “top” was oriented. Even though the holes are (in theory) symmetrical, it will be important to sew them together as aligned with the punch, so noting this now is important.

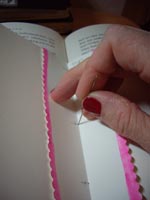
Punching the Signature
VII. Sewing
- Some general guidelines about sewing:
- The thread tension should be snug but not so tight that the holes are strained. The most important thing to is to pull your thread through each hole completely and not leave unintended slack loops. Check and double check this often, especially on the inside which is sometimes out of view.
- If the thread is getting tangled a lot, wax it (if you haven’t already) and/or cut it shorter and add a new strand when needed by double knotting it on the outside of the spine. The frustration of tangled thread is not worth it so take action if necessary.
- If the needle will not easily go through a hole, ensure that the pages of the signature are aligned and increase the hole size by gently passing the needle through from the inside of the signature.
- I find that the extensive handling during the sewing process leaves enough finger oils on the outside of the signatures to make them slightly resistant to watercolor. To avoid this I use disposable latex gloves for the sewing process. You really do not need to do this, and I don’t bother with the gloves for the rest of the project anyway.
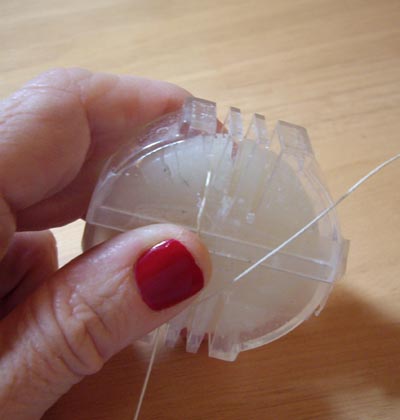
- Measure and cut a piece of thread about 80 inches long. If your thread is not pre-waxed, wax it by dragging it over the edge of a hunk of beeswax a few times. This will give it some stiffness and help keep it from tangling when you sew. You can skip this waxing step but it makes the sewing process much easier.

Waxing the Thread - We will now sew the signatures together. The resulting page set is called the “bookblock” in book binding lingo. We will be building the stack of signatures from the bottom up. Let’s refer to the signatures as A, B, C, D etc. from bottom to top, and to the holes as 1,2,3,4 and 5 from left to right. The first 2 signatures will be sewn together using one technique, and the rest of the signatures will be added using a different technique.

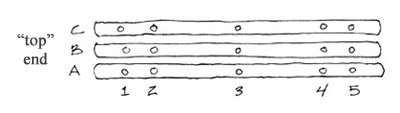
Hole Identification Chart
- Thread the needle.
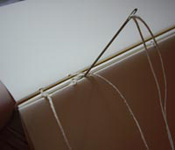
- Take a signature and align it with end you labeled “top” on the left. Sew into hole A-1 from the outside of the spine, leaving a tail of about 4 inches hanging out of the hole. From the inside of the spine, sew out of A-2.
- Place another signature on top of the first with the end labeled “top” on the left. Sew into B-2, and out B-3.Sew into A-3 and out A-4.>/p>Sew into B-4 and out B-5.Sew into A-5 and out A-4. A-4 now has 2 threads passing through it, as will most of the holes we sew through to attach signature B to A.
- Sew into B-4 and out B-3.Sew into A-3 and out A-2.Sew into B-2 and out B-1.
- Check that your thread has been completely pulled though each of the holes sewed, and then attach your long sewing thread to the short tail left in A-1 with a firm double square knot, right on top of the hole. This knot won’t show, so doesn’t have to be pretty. Do not cut either thread; continue to sew:

Making the Knot - Place a third signature on top of signature B, with the end labeled “top” on the left. Sew into C-1 and out C-2.
- Going from right to left, sew under the threads that span A-2 and B-2.


Sewing under A-2/B-2 Sew into C-2 and out C-3.
Sew under the threads spanning A-3 and B-3 from the right to the left.
Sew into C-3 and out C-4.
Sew under the threads spanning A4 and B4 from the right to the left.
Sew into C-4 and out C-5.
- Sew under the threads spanning A-5 and B-5 from the right to the left. Now sew under the thread coming out of C-5 from the left to the right.
- Place a fourth signature on top signature C, with the end labeled “top” on the left. We will now attach D to C as we attached C to B, but in the opposite direction:
- Sew into D-5 and out D-4. Sew under the threads spanning B-4 and C-4 from the left to the right.
- Sew into D-4 and out D-3. Sew under the threads spanning B-3 and C-3 from the left to the right.
- Sew into D-3 and out D-2. Sew under the threads spanning B-2 and C-2 from the left to the right.
- Sew into D-2 and out D-1. Sew under the threads spanning B-1 and C-1 from the left to the right.
- Sew under the thread coming out of D-1 from the right to the left.
- Repeat steps “f” through “i” to add more signatures until all your signatures (10,11 or 12) are sewn. You may find the paper clasps helpful to hold groups of signatures together as you sew.
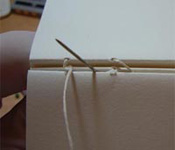
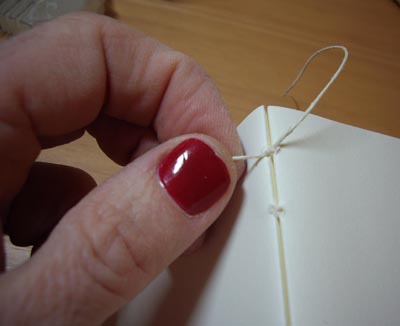
- Double check the entire book for any accidental slack thread loops. Secure the free end of the sewing thread by knotting it to the sewn thread loop just below it (spanning 1-1 or 5-5) with a firm double square knot, right on top of the hole.

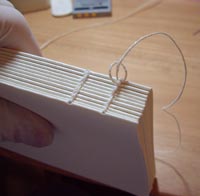
Making the Knot - Dab a bit of glue onto each of your thread knots to help secure them. Let dry. Trim the ends of the sewing threads near each of your knots, about 1/8” away.

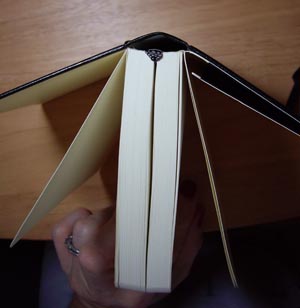
Bookblock after Sewing
- Examine the bookblock you have sewn. It need not be perfect, but if any pages stick out in a significant way from the top, bottom or front trim them to match the rest of the block. Sewing the signatures in the same orientation in which they were punched (via your “top” notations) ensures that your 5 stitched spine rows will be straight. If they are not straight it doesn’t hugely matter though since the spine will be covered up in this project.
VIII. Ripping
It is now time to (lovingly) rip apart the Moleskine in preparation to receive its new innards.
![]() |
| Center Section to be Removed |
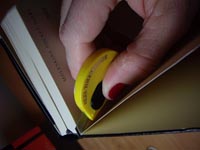
- Open up the Moleskine at the front between the stiff first sheet (the one that says “In case of loss…”) and the next thinner sheet (the one that says “Moleskine Pocket Diary”). Open the pages wide, gently prying them apart if necessary to do so.
- Using a razor knife, cut between these two pages to free the block of thin pages that make up the bulk of the book. Be careful; do not cut the stiff front page and do not cut the black cover.

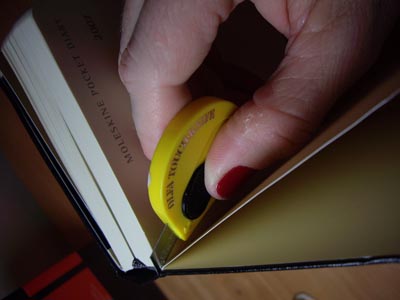
Making the Cut - Spread the stiff back page and last thin sheet wide open as you did in the front.
- Release the block of thin pages by making a similar cut at the back of the book, leaving the last stiffer page attached to the cover.
- If you intend to reuse the bookmark ribbon, peel it off the back of the thin page block and reserve it. Discard (recycle!) the block of thin pages.

Moleskine Cover After Pages Removed - The edges of the cover where you made your cuts will be a bit rough from old glue that is there. Lightly clean them up with small scissors, but be careful not to cut the stiff end pages. These rough edges won’t show and need not be perfect.
- The inside of the Moleskine spine is white. Since the Coptic binding allows a bit of the spine to show through between the signatures it looks best if the entire cover is black. Use your black paint or ink to paint the inside of the spine. You don’t have to be too precious about this but do hit all the white that shows. It is okay to get some black on the inside of the stiff end pages as well. Let dry.
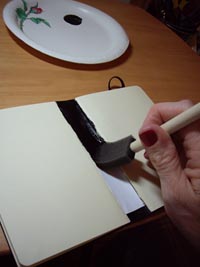
Painting the Spine
IX. Gluing
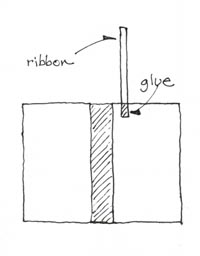
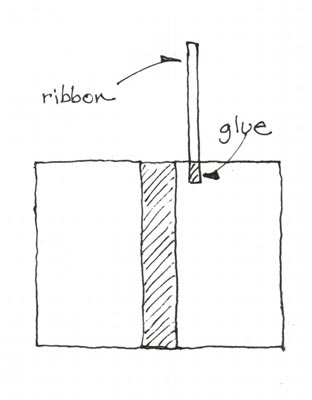
- Are you going to have a bookmark ribbon in your book? If so, glue the first 1/2 ” or so of the ribbon to the interior side of the back stiff page about 1/8″ in from the edge, so that rest of the ribbon is resting up away from the book. Let dry.

Placement of the Ribbon - We are going to glue the new bookblock into the Moleskine cover by gluing the first and last pages of the bookblock to the inside of the stiff end pages still attached to the Moleskine cover. Place the bookblock into the cover and examine how it will line up when glued. It is important to know where you are going before you start throwing glue around! You will be aligning the spine of the bookblock with the back (folded) edge of the stiff end pages and lining up the top and bottom of the bookblock as best you can with the top and bottom of the stiff end pages.
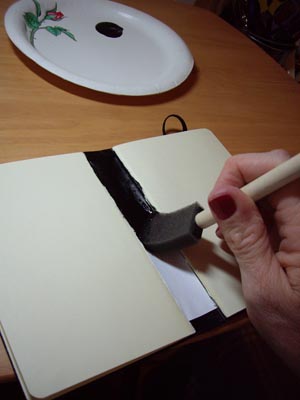
- Spread glue across the entire face of one side of the bookblock. It shouldn’t be goopy, but don’t skimp on glue. In particular, make sure there are no dry patches and use enough so that the glue won’t dry before you’ve had time to carefully place the pieces together.
- Carefully place the glue covered bookblock onto the inside of the back stiff page of the Moleskine cover, starting with the spine side and aligning the sewn edge of the bookblock with the folded edge of the stiff page. Note that you should not be putting glue on, or gluing anything to, the spine of the Moleskine cover.Press the sheets together working from the inside edge to the outer edge, sandwiching in the end of your bookmark ribbon if you have one. Use a bone folder or the back of a spoon to gently compress all parts of the sheets together. Make sure there are no bubbles or creases (not usually a problem because the papers involved are relatively stiff).
- Wipe any glue that may have squeezed out along the edges of the page. Don’t worry if the two pages have not aligned perfectly. As long as the spine-side edges are basically aligned and it’s not too far off up or down, it will be fine. The fore edge may not perfectly align. Use some wax paper or parchment paper to protect the Moleskine cover from glue drips, if the glued area is leaking at all.
- Now spread glue on the other side of the bookblock and glue it to the inside of the front stiff page of the Moleskine cover in a similar manner. This is a bit trickier because you don’t have as clear a view of the inside as the first time around, but now you’re a pro so it won’t be a problem! It is most important that the spine-side edges of your glued pages are well secured, as that is where most of the stress will be. Ensure that this edge is firmly seated for drying by placing the closed book under some weight and/or placing flat rubber bands around the glued pages right against the crease. Let dry.

Placement of Rubber Bands
X. Finishing
- Once dry, examine your book and if needed trim the fore edge of the pages for alignment. It doesn’t have to be perfect so don’t go overboard here; just make sure the pages don’t protrude beyond the Moleskine cover. Look at the first and last pages that were glued and see if you want to trim their fore edge if one side significantly overshoots the other.
- Gently erase the ”top” notations you made on each signature. If you have a bookmark, fold it down and slip between the pages of your book.
- If you like you can leave the page corners sharp, but you can also round them with a punch (fun!) or scissors (time consuming), or trim them at an angle with scissors (pretty easy). I use a corner punch and this step of the project is my favorite. It really pulls the book together and finishes it nicely.


The Final Product


July 24th, 2014 at 11:07 am
Alternatively, you can back my kickstarter and get the perfect sketchbook !!
https://www.kickstarter.com/projects/theperfectsketchbook/the-perfect-sketchbook-for-travel-artists-and-art
May 11th, 2014 at 12:09 am
Thank you so much for this really easy to understand tutorial! Have been looking for a while now for a turtorial that doesn’t require fancy equipment and is easy to follow and this is exactly it!
October 9th, 2013 at 12:37 am
Wow! thank you for such a detailed tutorial on bookbinding. I have been reading your section on how you sketch. I love your dedication and generosity in posting all the details. Thank you so much!
May 8th, 2013 at 5:41 am
Just a short note to say Thank You! I’ve made my fist watercolor sketchbook as you suggested, … but made my own covers. It was a great ‘tutorial” as I was able to make it in an afternoon. Clear, concise, and best of all … easy to follow! Blessings to you, and to those you care.
April 8th, 2013 at 5:06 am
[...] glued down. I thought about alternative ways of re-attaching the front cover– I’ve seen tutorials online where people slice the stiffer pages off of the inner page signatures in order to reload the [...]
January 24th, 2013 at 5:57 pm
Hello. I used your guide as an inspiration for my own notebooks. I just wanted to thank you. It’s a wonderful thing. I’ve already done three, with my own cover, with colour cloth. And I’m going to make more, as a gift to people I really care about. One of my friends loved it.
Thank you, again.
June 10th, 2012 at 8:51 pm
You are an absolute legend. I am amazed at your dedication. Your journals look wonderful – just made, and complete.
A true artist dedicated to their creative process is what you are.
I would love one of these journals as I am starting to use watercolor myself. I wonder if I can be as meticulous as you?
Thank you for sharing your process. It is much appreciated. : )
April 12th, 2012 at 3:06 am
I couldn’t resist from commenting. Exceptionally well composed!
January 10th, 2012 at 12:45 am
Remake it with Write In The Rain waterproof paper.
November 16th, 2011 at 9:45 pm
Thank you very much! These are very clear with pictures and diagrams that made things so much easier
September 28th, 2011 at 8:46 am
Thank you so much for that step by step guide, I will most certainly be
having a go at that, never seen a corner punch though, hope not too
hard to find, I agree finishes the job perfectly.,
September 13th, 2011 at 3:45 am
Very nice but I have two questions:
1. Why would you buy an expensive notebook and then tear it apart?
2. Your “finished product” has rounded corners — how to you achieve them?
Thank you.
September 7th, 2011 at 2:55 pm
oh yes, finally, just what I’ve been looking for, all across Italy I’ve seen folks make these books but out of leather and I wanted to try the same, that’s when a little free time allows for it. Your post will help tons, thanks
August 9th, 2011 at 3:08 pm
I can’t describe with words how grateful I am! I’ve been looking for a great guide in ages!(…well actually in some days – but it feels like ages ;)) My new diary – here I come!
Thank’s!
November 21st, 2010 at 10:14 pm
THANKS SO MUCH FOR THIS TUTORIAL!!!!! im a little scared to mess it up but u explained everything so well that im gonna put my fears aside and begin binding my sketchbook!!!
October 7th, 2010 at 6:39 am
Very clear instructions on this bookbinding technique. Enjoyed making my first book (and finishing it) thanks to this web page.
September 29th, 2010 at 3:43 am
Now, I have a question – my problem is, I use the vertical A-4 watercolor-appropriate Moleskine, and I wanted to get a horizontal one, but had no idea that they don’t exist. Someone refered me to this post so I could rebind my Moleskine a horizontal way.
Only problem is, I can’t fold the vertical Moleskine’s pages in two, because I want to keep the A4 size of the pages – on the other hand, I still want it to have the same flat-on-its-back quality a Moleskien would have.
Any suggestions as to how I may work this out?
September 27th, 2010 at 1:05 pm
[...] Rebind a Moleskine sketchbook with watercolour paper [...]
September 12th, 2010 at 12:15 pm
[...] block as ribbons. My short-term goal is to make a journal of watercolour paper. The idea came from this site, where the author demonstrates her process for “re-gutting” a Moleskine daily [...]
August 27th, 2010 at 3:25 am
Hello,
Your rep did my sketchbook, not as beautiful as yours, but very Brazilian, see http://www.elianatine.com.br/sketchbook-1/. Hugs.
August 25th, 2010 at 9:47 am
[...] or stiffer than paper, so the give a proper book stitch has, is more attractive too! I found a most informative tute here, dealing with paper and a Moleskin, but adaptable to fabric as [...]
August 20th, 2010 at 11:24 am
this tutorial inspired me to start repurposing old books! thank you so much!!
http://www.riggoo.com/handbound-journals_p_71.html
June 29th, 2010 at 7:12 pm
[...] Rebind hack: Read this hack to learn how to rebind a damaged Moleskine. [...]
June 26th, 2010 at 6:35 am
WOW! This was a fantastic tutorial! I always wondered how this really is done, and I just have to try it out some time! Should have discovered this a bit sooner, because some months ago, a place I shop, put out all their planners (all types and bindings) FREE OF CHARGE, for all their customers to grab for other uses. I got myself two of a really beautiful large size (almost A4) daily planner. It is not as nice as the moleskin’s (just love the leather and retro feel of those!), but almost! The covering is a synthetic material, but it looks really nice. Now I’m wondering if I shouldn’t just take the one I kept for myself and recycle it to a sketch book for myself, something I just happen to need. I’ll have to go and buy a nice sketchbook to make it from. I can’t get all the things you use for this, as it then would turn very expensive (prices are much higher here in Norway), but I think I can get by by using needles, rulers etc. I have, if I take my time. This book also have straight corners, so I can get by without the corner rounder for now. I have a couple of old moleskin’s too, the small notebooks, so maybe I’ll get a corner rounder when I get to those. I always loved them, especially used them when I’m travelling, carry one in my bag at all times, to make notes and do sketches. But I never liked the paper they use, since the quality is a bit poor even for writing, I think. It is just harder to write with my not-so-good-fingers on such porous paper. So upgrading them would be real fun. Heck, you really gave me some motivation now! Maybe I one day give it a go to make books from scratch. Now that would be really fun. With some nice fabric or leather for the cover, and really hard card board or even thin wood (plywood or what we usually call Huntonit, it is pressed fibre boards, I guess, with a really smooth, shiny surface on one side and a coarser surface on the other).
For the hole punching, I wonder if it would be OK if I put a fine machine needle in my sewing awl. That would be a really pleasent tool to use for that. Then for the sewing itself, I’m sure that one of my longer sewing needles will work well enough. I did search for book binding needles on eBay and found only one listing. That one said though that the needles are blunt, not sharp, so then I would think that you would have to use a different needle for punching than for sewing.
Again, thanks soooo much for taking the trouble of sharing this! It really seems like a great starting point for many great things, making scrap books yourself, making your own diaries, sketch books etc. as well as recycling nice books…
May 29th, 2010 at 5:30 am
Try the Fabriano “Venezia Book”! You will love it. Ciao
April 7th, 2010 at 2:35 am
Really, thanks for this serious effort writing all the nuts and bolts of this process down. I’m really glad that I’ve found your site, now it has an EPIC bookmark on it
I’ve just finished my first notebook and it looks excellent.
Just a quick note to others: while this really seems to be complicated and time-consuming, in reality it’s quite a relaxing process that you can enjoy so much! Just try to assure that you won’t be disturbed and keep your workspace clean. And don’t forget that if you want to do this several times, a paper trimmer can save you a lot of energy.
March 31st, 2010 at 8:18 pm
[...] bit of research on-line (a couple of good starting points, if anyone else wants to try it, here and here, although I’ve changed a few things to suit my own way of doing it), and got a bit of help [...]
March 12th, 2010 at 7:23 pm
good lord. I appreciate your efforts, but would never go to that much trouble myself – I would get impatient, then angry if things were not going my way, and eventually you would find the paper and thread on the floor with me crazily stomping up and down on it. Sort of like the one time I tried to wallpaper.
I agree with you, though – about the paper. The sketchbook card stock is horrible for watercolor, and too smooth for my taste for pencils.
March 1st, 2010 at 8:34 am
Thank you for a fabulous tutorial. I’m a late-comer to your site, but I’m so happy I found it! I finished my little red reloaded moleskine yesterday. It’s not perfect, but it’s pretty good for a beginner (IMHO). The next one will be be even better. Thank you again for taking the time and effort to put these instructions on your site. I had a lot of fun doing this project.
February 18th, 2010 at 5:57 am
[...] Trumpet Vine [...]
February 17th, 2010 at 10:06 am
[...] Rebind a Moleskine sketchbook with watercolour paper [...]
January 25th, 2010 at 8:36 pm
Martha, these instructions are really wonderful and I am planning on making my own book and teaching my students how to make one, too.
However, I’m wondering if you know of any equally well explained instructions for making a cover for the book instead of using a moleskine, which is not practical for using in my classroom (I teach high school art).
I would be most grateful if you, or any of your readers could email me with any suggestions.
Thanks again!
January 17th, 2010 at 5:28 pm
Hi Everyone,
Thanks for the great site and instructions. Can anyone refer me to a source for used or outdated daily planners? Thanks much!
Dan
December 21st, 2009 at 10:09 am
Amazing bookbinding skills.
Robert
December 20th, 2009 at 1:57 pm
Thanks Martha
could you explain the hole punch bit to make the rounded edges
i cant seem to work it out
December 19th, 2009 at 6:23 am
[...] Moleskine Reloaded – not so much “Pimp My Moleskine” more “Gut My Moleskine”. Via Craftzine. [...]
December 12th, 2009 at 1:28 pm
Martha, you are so generous with your time and knowledge. I enjoyed reading your very clear instructions for repapering a moleskine sketch book cover. I’ve seen exhibits of paintings done on old book covers that were quite intriging too. Thanks for the information.
December 11th, 2009 at 8:01 pm
Thanks so much for this tutorial.
I’ve been planning to replace the pages in my moleskine for a while, but was nervous about not knowing how to remove the old pages! It’s fantastic that there is a moleskine specific tutorial out there!
September 28th, 2009 at 12:14 pm
Martha, this tutorial is fanatstic! It is so easy to follow! Thankyou for sharing it! Can’t wait to have a go!!! Leanne.
September 22nd, 2009 at 2:24 am
Steve: Make a bookblock the same thickness as the original Moleskine bookblock. As for the number of sheets per signature, for thick paper like 300 g/m2, 2 sheets is enough. Moleskine sketchbooks (the ones with yellow paper) have slightly thinner paper, and 3 sheets per signature. It depends on the thickness of the paper.
September 21st, 2009 at 9:17 am
first of all: THANK you! I haven’t been able to find a tutorial about bookbinding as clear as this one. I’ve already used it and it worked! am so glad with the end result.
I have a question though…do you have ideas or tips on how to bind lose pages? I’ve started a project collecting random pieces of paper that I like (like envelopes, or packaging) and want to bind it all into a notebook. But I am stumped as to how to do it. Do you have any ideas as to how I could go about doing it?
August 19th, 2009 at 5:28 pm
Hi
Excellent article / how-to
Is there some mathematical formula for calculating number of sheets per signature & number of signatures needed to re-bind a notebook
I have just acquired 3x of the larger Moleskine weekly planners (21cmx13cm) for £2.80 ($4.62) each & am not sure how to calculate number of signatures needed & number of sheets per signature
Thanks
August 17th, 2009 at 2:28 am
Thank you so much! I also struggle finding nice sketchbooks that have pleasing proportions and paper that doesn’t make ink smudge, so your idea was perfect for me. I didn’t have the guts to try it out on a moleskine, so I made my own cover as well, and the instuctions were fantastic. They were clear, and the pictures helped whenever I was unsure. I now have such a nice sketchbook, I want to make more.
Thanks,
Fran
June 20th, 2009 at 5:57 pm
Thank you so much for this tutorial! It was so clear and easy to understand! I was able to make my own sketchbook without any difficulty!
May 27th, 2009 at 10:15 pm
This is by far the best, detailed, and clear instructions on how to make a book. Moleskine or not, it makes a wonderful book. Does not complicate things, and encourages people to give it a go. Cheers!
May 13th, 2009 at 3:51 am
[...] tutorial per “hackerare” la propria Moleskine giá acquistata. Il post s’intitola “Moleskine Reloaded…or, How to Rebind a Moleskine Notebook : Make a Custom DIY Sketchbook!&#… ed é concesso gentilmente da Trumpetvine.com, di cui non so nulla se non che si occupa di riempire [...]
April 25th, 2009 at 5:55 am
[...] Rebind your Moleskine [...]
April 16th, 2009 at 6:56 am
your blog encouraged me to start my art again… after stopping for five years! i’ve picked up my sketchbook (although a totally different style than yours), and i just bound a book tonight! wow… thanks a lot, martha.
March 29th, 2009 at 10:01 pm
I read this post months ago when I first started getting into sketching, and told myself that once I’d filled up a couple standard Moleskines I’d try this out as a reward.
Tomorrow I’ll do my first drawing in my newly rebound Moleskine, thanks to your detailed and easy to understand instructions. Thanks!
March 29th, 2009 at 11:37 am
Wow! I’m amazed at a) what you do several times a year (you said you used 3 sketchbooks a year) b) at the detailed tutorial!
Thanks for sharing this, but I think I would prefer to see it before I try it. However it has answered one of my many questions as to what paper you can sketch on, since none of the sketchbooks on sale offer good quality paper… I have so far sketched on terrible paper, and it has surprisingly taught me a lot, but sketching on ‘real’ watercolour paper would be so more comfortable that I was acually considering sewing some good watercolour paper sheets together and ther you come with your wonderful tutorial!! So it can be done! Thanks again!
March 7th, 2009 at 5:29 am
I just loved these detailed descriptions!
Thank you for taking your time to show us this!!
Just wonderful!
Best wishes
Hank
February 24th, 2009 at 2:18 pm
I think this is wonderful! I love you attention to detail and the finished product is absolutely beautiful.
My husband and I are thinking of making these as a small side business. If you have an interest in buying them, please let me know. Thanks so much.
Audrey
January 2nd, 2009 at 10:59 am
You probably get this a lot as it is already but I don’t suppose you would be interested in making one for a service member stationed overseas? I wish I could do this myself but believe me, I don’t think I would succeed nearly as well.
Just thought I’d ask.
December 15th, 2008 at 1:38 pm
[...] for the ultimate in customization: Make your own notebook or reload a Moleskine. I call mine [...]
December 14th, 2008 at 9:33 am
Made one last night out of an old journal. Used a sample pack from Strathmore. Seven different kinds of paper and I even threw in a sheet of Yopo. Can’t wait to get started. Thanks for the detailed directions!!!
November 25th, 2008 at 5:45 pm
As a 68-year-old retired graphic designer, it is lovely to discover that there are still things I can learn. I have been keeping travel journals for years; but I always used whichever sketchbooks I could buy. Now I am inspired.
We are heading back to France in a few weeks for the umteenth time and I hope to have my new handy-dandy, homemade moleskine travel journal with me.
Thanks for such a complete and thorough lesson.
November 18th, 2008 at 8:40 am
Thank You for this wonderful tutorial!!!! I acted immediately and in just a few days made my own eleven sketchbooks! I also made the cover out of cardboard and fake leather and made my own little pocket in the back.
It was a great great thing to do!!! Thank You!
You can see them here,
http://www.facebook.com/album.php?aid=48361&l=f7893&id=605017583
Sincerely,
Shivadas
November 18th, 2008 at 4:27 am
Thank you for your great instructions Martha!
I am tempted to try to fill a thick daily planner with pages from two large ruled Notebooks. I guess that wouldn’t require any sewing but just gluing the two sets of Notebook papers into one daily planner. I think I’ll try that with help from your instructions
By the way, does anyone know if there’s old daily planners on sale somewhere in the internet..?
November 16th, 2008 at 11:40 am
I did it too! Thank you so much, Martha! I just made my first ink and watercolor sketch in my new reloaded Moleskine. What a joy to have the paint go where I wanted it to instead of beading up into frustrating globs. I have never sewn anything successfully, and your directions were spot on. It was a lot of work, but I think I’ll do a lot more sketching now that I’m not afraid of the paper
October 1st, 2008 at 10:10 am
[...] Travels includes the definitive directions for making your own Moleskine pocket sketchbooks. It is also a wonderful site for browsing and [...]
September 19th, 2008 at 2:05 am
Thanks for the inspiration.. I have a moleskine diary that I barely used, but it’s too good to throw away (don’t you just love the covers?) – prefer my blank moleskines.. I’ll give this a go.
September 13th, 2008 at 3:39 pm
[...] I found this great tutorial from Trumpetvine called Moleskine Reloaded, which explains how to rebind a notebook with your own choice of [...]
September 9th, 2008 at 6:52 pm
[...] here’s a more detailed HowTo on how to bookbind by hand a Moleskine. Possibly related posts: (automatically generated)moleskine [...]
September 9th, 2008 at 6:48 pm
Totally awesome. Nothing comes close!
August 12th, 2008 at 1:05 pm
Thank you for the instructions. I would be happy to take the paper that you remove from your books. Contact me and we can make arrangements if you would like
August 3rd, 2008 at 5:09 pm
I wish I had found your website one day earlier! I tore up a few old moleskines for recycling yesterday. After I found your website, I fished the covers out of the recycling box, but I’ll have to do some modifications to tidy them up because of the way I tore the paper out. Thanks for the fantastic instructions!
July 29th, 2008 at 10:17 pm
[...] Japanese-style folding book, but I rebound it with HP (hot press) watercolor paper, as is my preference with the regular [...]
July 9th, 2008 at 5:13 am
[...] For artists who want more. If you like everything about Moleskine notebooks but would prefer to use your favorite sketching paper instead, here’s a how-to guide on combining both. [...]
July 9th, 2008 at 4:52 am
[...] For artists who want more. If you like everything about Moleskine notebooks but would prefer to use your favorite sketching paper instead, here’s a how-to guide on combining both. [...]
June 18th, 2008 at 6:36 pm
[...] have always liked this tutorial since I found it. It’s about moleskin journals, but I think that you could pretty much use it [...]
June 4th, 2008 at 3:49 pm
Elizabeth:
Serendipity indeed!
You are right: the Moleskine Reloaded instructions are not for the accordion book – they are for a regular bound sketchbook. The accordian books are for the swaps that are currently in play – just a coincidence they’re both Moleskines.
As to why I start with a Moleskine, I have made entire books too and that is great fun, but for my sketchbooks l like consistency and I find the form factor and materials of these fatter Moleskines are just right for me.
June 4th, 2008 at 12:04 pm
Great instructions, very clear and simple. I’m glad to have found you. I was looking for information about (real) trumpet vine, as the one I planted three years ago is finally showing signs of life- but I’m also a watercolor painter so this was serendipity for sure!
I want to make sure I’m not missing something, though- you’re not making the accordion style Moleskine book, right? But those are the ones used in the exchange? I’ve always wanted to make a larger sketchbook that was accordion style, I love the idea of playing with the transitions. I guess I don’t quite understand, if you’re only using the cover of the Moleskine, why not just make your own cover and not have to buy the M at all?
June 3rd, 2008 at 11:52 am
Sketches:
Actually, you can get some amazing deals on outdated yearly planners. Keep on the lookout!
June 3rd, 2008 at 7:27 am
Moleskines are pretty expensive nowadays right? I’ll have to save up.
May 29th, 2008 at 9:22 am
hi! this is awesome!
great explanation and understandable tutorial.
thanx for sharing!
May 25th, 2008 at 8:14 pm
[...] you love the Moleskine but don’t think the paper quality is good enough, here is a way to rebind it with paper you choose. I’ve been thinking about binding my own journals/notebooks lately, but Hong Kong isn’t [...]
April 22nd, 2008 at 11:43 am
First, thanks for that
Useful for stitching any paper to make any book. Secondly, do you have instructions on how to make your own cover (I dont want a moleskine one).
April 19th, 2008 at 6:53 am
Thank you! What a great re-use idea! Thanks!!
April 16th, 2008 at 5:31 pm
Thank you!
Regarding printing, I do not have a PDF of this article but there is a print style sheet associated with the web page, which means that if you print it from your browser it should look nice and clean.
You can do a “print preview” and choose the pages with the article content (about 1-12) and skip printing all of the comments (currently pages 13-27!).
April 15th, 2008 at 9:19 pm
Great illustrations and elaborate DIY explanations. Thanks!!
No wonder, you are getting thank you remarks till today, even after publishing more than a year back!
By the way, I came across this page from here : http://tipnut.com/diy-bookmaking-bookbinding-book-press-buncha-links/
On this page they have listed similar projects on Hand Book Binding. But, I must state that yours is pretty impressive, in comparison to other DIYs on this. 3-cheers to you!
PS: Do you have this article in PDF, with the photographs?(I’m feeling greedy) I can print and use it as a reference manual, while doing the binding.
April 2nd, 2008 at 11:35 am
Thank you for this great tutorial. It prompted me to finally try it and I just completed it this morning. I had to adapt it, as I did not use a moleskin book, but made my own covers and taped the spine. It came out pretty cute and I will be making more. You can check it out on my flicker page. I put a link to this page for others to follow your directions, hope that was ok. Thanks again.
http://www.flickr.com/photos/11611455@N00/
March 29th, 2008 at 1:13 pm
Thanks so much for this very clear tutorial.
It was very easy to make. It looked difficult but once i just started it was so easy. And i am so pleased with my very own self made, sketch book, just the size i want. and with the paper i want in it. I have made two by now. This is much nicer more valuable and MUCH MORE FUN then just buying a sketch book in a shop.
I did not use the moleskine cover i made one myself and added the backpocket and other moleskine elements into it.
Cheers!
March 23rd, 2008 at 8:56 pm
[...] How to Rebind a Moleskine Notebook: Make a Custom DIY Sketchbook! [link] [...]
March 22nd, 2008 at 7:37 pm
Thank you so much! can’t wait to get started.
March 14th, 2008 at 7:59 am
These instructions were just brilliant, I can’t wait to use my re-loaded moleskine. Thank you so much!
March 1st, 2008 at 6:04 am
This is really wonderful! Thanks for sharing such real tips — I loved sketching in the Moleskins when I lived in Italy — what I called “Drive by Sketching, quick sketches done while my husband was driving and then putting in the washes later. I can’t wait to read your whole blog!!
My “drive-bys” are in the blog “livecheapmakeart.blogspot.com” — search “watercolors”
thanks for such great info — your watercolors are lovely and I look forward to learning more from you!
February 11th, 2008 at 1:14 pm
I found this on a Crafters Forum. I’ve made books before. But I make my own covers. The sewing of the signatures is awesome! Thank you for the information on this. Great tutorial!
February 9th, 2008 at 2:51 pm
Thank you! I took a bookmaking class…cardboard and scrapbook paper, made up the cover, I made a couple books, and always wanted to make more…your site, and excellent instructions are encouraging me to get into it again, as I am getting into journaling and drawing, it would be great, to make my own books too…thanks for your kindness in sharing your instructions with everyone….
February 1st, 2008 at 2:09 pm
great instructional
i am going to use this to do the book binding i have always wanted to do
thank you
January 2nd, 2008 at 6:14 pm
[...] wanting to spice up the old moleskin for a new journal, here’s a great blog entry, “moleskin reloaded”. Here’s to more creative and beauty-filled [...]
December 29th, 2007 at 3:35 pm
Wow, this tutorial was so inspiring! I added a few of my own touches, but yours was absolutely the most helpful I could find. I made a journal as a gift for my boyfriend and it came out much better than I had anticipated! Everyone loved it! Thank you SO much!
December 27th, 2007 at 10:48 am
[...] like this, I found my self back at Trumpetvine Travels re-reading Martha’s most excellent book binding instructions. Hers are the most clear and detailed I’ve [...]
December 22nd, 2007 at 10:15 pm
Wow, almost a year from publication and this is the coolest application of bookbinding I’ve seen. I’m working on a handcrafted book this moment in fact, although I’m using an ordinary hardback cover instead of the faux “moleskin” as well as working with a larger (5.75 x 8.5 in) book. I’m planning a notable addition to the cover anyway, which I’ll share on http://www.flightcomics.com/forum/ when it’s complete.
Thank you so much for the inspiration and instruction!
December 19th, 2007 at 12:36 am
Thank you so much for these instructions, Martha!
I promised myself I would stop buying art supplies, but after this, I simply cannot stop myself. Now let’s hope they pay me soon! my checking account is down to 30 bucks, hah!
Thanks, Irene, for the link! I just ordered two. I can’t believe how extremely cheap those are being sold!
December 18th, 2007 at 4:32 pm
I just thought about doing this the other day! Thank you for the instructions so i won´t have to reinvent the wheel.
December 12th, 2007 at 2:11 pm
[...] Your Magazine into a hardbound book Mini-zine Tutorial Vintage Envelop Accordian Book Tutorial ReLoaded Moleskin Sketch Book – really great for putting new pages into interesting old hard covers Make Your Own Mini Hardcover [...]
December 4th, 2007 at 3:02 pm
Thank you Martha for the wonderful instructions! I just finished making my first rebound moleskine sketchbook…I can’t wait to use it! Oh, and thank you Irene for the link to shiptheweb…I ordered 4 from their website and received them just in time to make my first sketchbook.
November 23rd, 2007 at 7:10 pm
Well, wow. An amazingly creative thing to do. And so very very generous of you to take so much time in posting all of it.
November 21st, 2007 at 9:54 am
Thought this might be of interest:
http://www.shiptheweb.com/epages/ShipTheWeb.storefront/EN/product/KIK&2DMB517D&2D2007
2007 Moleskine on an unbelievable sale.
I love your idea and thank you for such a wonderful tutorial. I can’t wait to try it.
November 9th, 2007 at 12:01 am
Wow, these seems great. i wish i could feel them, touch them. You are creative human being!
November 3rd, 2007 at 7:20 pm
Thanks for the detailed instructions. I have a nice leather cover that needs a new notebook. The notebook is a non-standard size, and the manufacturer no longer produces it. Now I know how to make my own, and in fact I did!
I found your instructions this morning, by evening I had made my notebook.
October 13th, 2007 at 6:18 am
[...] Moleskine Reloaded …or, How to Rebind a Moleskine Notebook [...]
October 8th, 2007 at 8:54 pm
[...] ahorrarte dinero y comprar alguna parecida en cualquier papelería o leer manuales para crear una (2) en tu propia casa, la verdad es puro glamour (y me gusta, no lo [...]
October 8th, 2007 at 3:49 am
wow! what a great idea and great instructions. I’d love to try it, but right now I’m not finding any planners or agendas on sale.
Thanks so much for these great instructions!!
October 3rd, 2007 at 9:13 am
Martha,
I bound my own Arches travel sketchbook, thanks to your instructions. I made a cover too as I do not have a Moleskine.
September 26th, 2007 at 6:08 pm
I have managed to lay my hands on some of the things I need to make one of these but I am having difficulty buying the paper. How many gsm is 90 lb?
September 26th, 2007 at 10:27 am
Thank you so much for these beautifully crafted instructions! I am very inspired by your site.
September 21st, 2007 at 12:07 am
Cheers Martha,
Just finished my version of the book using Cold Press Fabriano Artistico paper and it turned out perfect! Think I’m gonna head down to the Lake and sketch a little now!
Thanx for this great tutorial, I’ll never buy another sketchbook again, just have to keep my eyes peeled for those discounted Moleskine Daily Journals!
Matt from Switzerland
September 13th, 2007 at 4:32 am
thank you so much for putting so much time into this wonderful how-to! im so exited to try this now, i feel like i need to drop everything and start on my new sketchbook! plus, its very generic, so i can customize it as i see fit, and i have SO many ideas!
September 10th, 2007 at 6:16 pm
Would you consider selling these on Etsy (or elsewhere)? I am not very dexterous but would love something like this with hot-pressed paper in it…
August 27th, 2007 at 7:16 pm
Wow. You really described it … properly and in detail, huh.
Makes me wanna try it too…
But I find the materials “hard to find”
August 27th, 2007 at 8:48 am
PS, I AM a technical writer, and MAY I SAY, you did a fabulous job, Martha.
August 27th, 2007 at 8:47 am
Thanks so much. I am lucky to have a great sketchbook produced locally (The Great Canadian Sketchbook: 50 sheets of 110 lb hot press, available through the mail at Opus Framing and Art Supplies, http://www.opusframing.ca) However, I’m a sketchbook junkie and also– I have several pads and blocks of unused w/c paper. I just don’t seem to be a “block” kind of girl–so now I’m excited to see what kind of sketchbooks I can make, with the bonus of getting those. Opus also has all the bookbinding supplies, except the CornerAdorner.
Also, it’s late August and just as you suggested, Amazon is blowing out Moleskine planners at something like 90% off, both large and small formats.
Thanks to Jana Bouc (whose blog I have enjoyed) for pointing us at this article.
August 26th, 2007 at 6:10 pm
What a great lesson plan and so well presented too. Seems like sooo much work though to redo a journal with a simple black cover.
August 26th, 2007 at 3:15 pm
I finally did it!
http://blog.artandstory.com/2007/08/24/moleskine-modification
All in all I’m pretty happy with my first try at this. Though next time I will try and sew the signatures to one-another a bit more tightly. Still, it will serve its purpose well. Thanks again for your terrific “how-to” on this!!!
August 20th, 2007 at 11:22 am
Thanks for sharing. looks fantastic!
August 1st, 2007 at 2:43 pm
Hi Jermaine:
There are many “flavors” of Moleskine: notebook, sketchbook, watercolor book, etc. However, for any given flavor the large Moleskine has the exact same paper as the small one. It’s the “sketchbook” that has the yellowish paper.
As for what happens when you erase that paper, I don’t know. A good place for info on all things Moleskine is:
http://www.moleskinerie.com
An alternative would be, of course, to rebind a Moleskine with the paper of your choice per the post you replied to here.
Good luck!
July 31st, 2007 at 12:25 pm
I have been thinking about purchasing a few of the large Moleskine sketchbooks. I was just about to purchase them when I read they contain white paper. It’s the yellowish paper that attracted me to the Mokeskine sketchbooks. So I did some research and saw a online article that said it was “white paper coated with that strange finish, which fades when erasing, and is pretty much useless for watercolors. “
I can care less about not being able to watercolor but I am concerned about the paper. Is the paper white or is it yellowish, and does it fade when erased? Can someone confirm this and can someone recommend a alternative?
Thanks in advance
June 15th, 2007 at 7:58 am
[...] Moleskine Reloaded : Sketching and Sketchbooks [...]
June 13th, 2007 at 8:32 pm
Wow, that looks complicated but the end results are amazing.
I’ll have to give that a try sometime.
May 21st, 2007 at 8:32 pm
[...] It was a delight seeing her drawings in person in her custom made sketchbook (that she gives directions how to make on her blog). I had so much fun hanging out, chatting, drawing and hiking with her. We [...]
May 14th, 2007 at 9:21 am
[...] Rebind your Moleskine [...]
May 13th, 2007 at 2:53 am
Once I am finished with my current pocket Moleskine sketchbook, I am tempted to cut out the finished pages and (maybe) rebind them or just store them somehow and re-fill the cover with proper sketching paper rather than the buff coloured thin card that the ‘sketchbook’ comes with. Then again, I have started to like the buff card and so I may just buy another one when I finish! ;-p
May 12th, 2007 at 7:53 pm
[...] Get Them Here [...]
May 12th, 2007 at 12:33 pm
Thanks so much, Martha! My sister and I made 4 of these for my brother for his birthday, and your instructions were perfect! We used arches 90hp, and the whole project took us about 3-4 hours. So worth it when he saw that the paper wasn’t your typical Moleskine! He loved them!
April 23rd, 2007 at 11:39 am
[...] one of the many wood lined pantries behind the bar. The sketch is done on half of a spread in my (reloaded) Pocket Moleskine, so it’s a small one. It still required a full glass to wine to complete, [...]
April 10th, 2007 at 12:30 am
[...] possibilities of bookbinding. I plan to have a go myself sometime, using these wonderfully clear instructions (but without the [...]
April 9th, 2007 at 11:34 pm
Found this via Shirley’s http://www.PaperandThreads.com. Thanks for such clear and detailed instructions – I shall be back later!
April 8th, 2007 at 1:24 pm
Great instructions!!!!! You make it look possible for even someone like me to do it, but as Jamie said in her post,
“If you build it, I’ll buy it!
I’m sure others would too. Nice work.”
Put me on your list of buyers. Thanks for sharing,
Alexis
March 26th, 2007 at 4:36 pm
[...] Syndicated via RSS from del.icio.us/tag/diy Passing Time? Learn new [...]
March 24th, 2007 at 7:47 am
[...] Moleskin Reloaded: Resurrect your sketchbook with this comprehensive tutorial on (re)binding a book by hand [...]
March 17th, 2007 at 12:27 pm
If you build it, I’ll buy it!
I’m sure others would too. Nice work.
Jamie
March 14th, 2007 at 8:25 pm
[...] Moleskine Reloaded : Trumpetvine Travels [...]
February 20th, 2007 at 4:53 pm
Found your instructions a few weeks ago, and decided to try it out on a large moleskine sketchbook rather than the pocket format. I now have a great sketchbook with watercolor paper.
I celebrated by sketching the whole process on the first pages.
Thanks
February 16th, 2007 at 2:15 pm
I followed your instructions and everything came out perfectly. I had a few sheets that stuck out, but I recognized this as I was sewing signatures and substituted some of the extra pages. I used 90# Fabriano Artistico, and think I could probably add one signature next time (with or without the address book). Excellent instructions and illustrations. My confidence after this project led me to do a leather bound, standard case binding project, which also came out well! Thanks again!
February 5th, 2007 at 9:15 pm
[...] As I said in a recent post, I ordered two blue and two purple Moleskines, but the purple ones turned out to be file folders ("Moleskine Small Memo Pockets"), not sketchbooks. I was going to do the Moleskine Reloaded project from trumpetvine.com but, I’m not that motivated and have little patience. I thought I’d somehow transfer some paper or the innards of another journal into the purple Moleskine, and then it hit me, DUH, go get a set of the Moleskine "cahiers" and glue them in somehow. They are moleskines, they are the right size, a no-brainer. [...]
February 4th, 2007 at 2:38 pm
I ordered two purple moleskines thinking they were sketchbooks but they turned out to be folders. I’d like to replace the folders w/ sketching paper, so I was VERY glad to find this article. Thanks for putting so much work into it. I am not sure I’m up to it though, I’m very intimidated, it looks hard to do. Still trying to decide.
February 4th, 2007 at 2:38 pm
[...] trumpetvine.com/moleskine-reloaded … but I’m not sure if I’m up to it, it looks more involved than something I have the patience for. But maybe not. Still deciding. Maybe I’ll find an old sketchbook or something that I can just transfer the paper from. Hmmm… thinking… [...]
February 3rd, 2007 at 11:54 am
What a wonderful idea!!! I have to try this alright!!
February 1st, 2007 at 6:34 pm
This is brilliant! Now I can have exactly the notebook I want. I’ve never done a sewn binding before, but am game to give it a try.
February 1st, 2007 at 3:43 pm
These instructions are incredible! I have an old Moleskine I am going to try this on. Thanks for all your work in putting this together.
January 31st, 2007 at 5:12 pm
Yari: The cutting step yields 30 cut pieces and you fold 24 of those. You have 6 left over, of which one is used in a later step as a punching guide. I will revise the instructions to make this more clear!
And no, I don’t sell these (or anything else!). Do let us know how your project turns out, if you decide to do it!
January 31st, 2007 at 5:05 pm
Lee-Roy: Great information – thanks for sharing!
January 31st, 2007 at 4:44 pm
I got lost betwwen the “cutting” and the “folding” STEPS!
In the cutting step you have very small pieces of paper (5.5″ x 7″) and then in the next step, FOLDING now I am confronted with 24 sheets ( of what dimensions?) of paper that I need to fold. Gotta read this carefully before I attempt it!
__
You could be a technical writer, you have illustrated the process well and I know I most be confused and If I read carefully I will know WHY the cutting & folding steps confused me….
Thanks a bunch.
Do you sell them???
January 31st, 2007 at 4:42 pm
A footnote for anyone who finds it useful. Fabriano papers may be listed in gsm (grams per square meter) instead of pounds. This was the case at my local Blick art supply and they weren’t able to tell me what the equivalants were in pounds. However, they only had 200 gsm and 300 gsm weights in Fabrianos and the 200 gsm was priced similarly to a 90 lb arches of the same size. Looking online for answers was a little tricky, as the conversion from gsm to lbs seemed can vary greatly depending on the size/sort of paper. Finally, I was able to find this page on watercolor papers which had a table (close to the bottom of the page): http://www.handprint.com/HP/WCL/paper1.html
Anyway, all that explanation aside, the bottom line is a 200 gsm watercolor paper is equal to 94 or “90″ lb. 22″ x 30″ watercolor paper.
January 27th, 2007 at 5:21 pm
Today was the day! I found my two year old Moleskein Daily Planner and reloaded it using your incredible instructions.
I’ve been making books and binding them for several years now yet have never found binding instructions this easy to follow.
My only mistake was too many signatures. I used Fabrian Uno 140 lb hot press and should have cut the number of signatures. I was too lazy to rebind so I have a stuffed Reloaded Moleskein! LOL
Thank you so much for sharing your easy to follow instrutions.
Roberta
January 27th, 2007 at 2:30 pm
Great. Very helpful. I don´t like Moleskine paper either, but I won´t buy one for rebuilding it. I´ll use another kind of cover. Thanks for the guide
January 23rd, 2007 at 8:09 am
For another option, I found a sketckbook called Hand-Book by Global Arts which comes in pocket size and 5.5 x 8″. The paper is buff and takes light watercolor washes well. It is about 2/3 the cost of Moleskin books.
January 22nd, 2007 at 3:16 pm
[...] Trumpetvine Travels has a great post today covering how to replace the inside of a Moleskine Daily Pocket Planner with more specialized papers. The post, Moleskine Reloaded, is also a great reference for anyone wanting to look into binding their own notebooks. [...]
January 21st, 2007 at 9:35 am
Years ago I wanted to learn origami. I went to the library, got a book, came home, couldn’t follow the directions, decided I was stupid, and quit. Years and years later, I discovered the directions in the book were stupid – not me – and I have done origami with my elementary students ever since. Your directions are INCREDIBLE! Many people never learn to do things they would love because it isn’t explained to them properly. I can’t wait for my materials to arrive (thanks for making that part easy too!). From one teacher to another (and you are a great teacher!), Thank you!
Connie
January 19th, 2007 at 7:14 pm
Bravo, Linda!
You are the first person I know of to complete this project. I am so pleased that you found the instructions helpful and easy to follow. Thank you for sharing your success!
January 19th, 2007 at 7:32 am
I did it!!!
I have wanted to rebind a Moleskine ever since I saw your materials on your Trumptevine site (under the sketchcrawl section). Then suddenly I found myself with both the weekly and daily pocket planners at the New Year. Not needing both, I decided to try rebinding the weekly planner so I could practice on a smaller scale.
Your directions were fabulous – very clear and concise. I admit that I have made 3 other sketchbooks using coptic binding, but I’m not an expert at all and had quickly forgotten how. The pictures helped tremendously, but your writing was very easy to understand. Very clear. Much clearer than the directions I used before.
I, too, loved Moleskines but hated the paper. I do have the watercolor version, but don’t like the perforated paper – and this way, you can choose between hot and cold press, or between 90 or 140 lb. So much more flexibility. I enjoyed the process very much and the sewing made me think of artists that stretch and prime their canvas. It is calming to prepare the place where you will work. It gives you time to dream.
Anyway, thanks so much for sharing this!
January 19th, 2007 at 6:25 am
This is absolutely brilliant. Thank you.
January 18th, 2007 at 3:44 pm
Thank you all!
Regarding an alternate cover, there are many possibilities (check out bookbinding sites and books).
However, the Coptic binding is nice looking and strong enough that a spine covering isn’t necessary. Thus there is one simple way to go:
Create 2 pieces (front and back) of cardboard, thick paper, metal, leather, or wood slightly bigger than your bookblock. You can paint, collage, etc. these covers to decorate them. Then, simply glue the cover pieces onto the front and back of your bookblock. The spine will be completely exposed and should look quite nice. You can even use colored thread to bind your book to better show off the Coptic stitching.
January 18th, 2007 at 8:10 am
Thank you so much for this. I’ll think I’ll try it on one of my old moleskine sketchbooks first, then if I’m successful, move on to the day planner. Thanks again
January 16th, 2007 at 9:15 am
What a fantastic, well illustrated, clearly written resource you’ve created here! If I can marshal together enough time and courage, I may actually try this. Thank you, and thank you for the nice comment on my blog too.
January 16th, 2007 at 6:09 am
First I want to thank you for visiting my blog a few weeks ago.
Your instructions here are awesome. It wasn’t till this past year that I started to take sketchbooks seriously. Your sketches and others I have come across are real jems and I want to thank you for sharing. I will be back on a regular basis.
January 16th, 2007 at 4:46 am
Thank you so much for sharing these instructions!!!! I´ve also been frustrated with the Moleskine paper when I have wanted to use it for watercolours. And been sad, since I really love the Moleskines. But your instructions has given me hope to be able to use them!!!! With every step so well explained I´m sure I will try. Thank You!
January 15th, 2007 at 4:30 pm
Thanks for this, Martha. As some others have pointed out, you describe the process exceptionally well. Very crafty and inspiring. I might just do it. Will let you know what happens.
January 15th, 2007 at 3:13 pm
Omigod.
January 15th, 2007 at 2:15 pm
wow. thanks for taking the time to write this up. I have exactly the same issues with Moleskine. I need w/c paper and just don’t feel comfortable with the new
w/c orientation.
Fabriano Artistico in a Moleskine. This is my dream journal. Thanks.
January 15th, 2007 at 2:00 pm
Excellent instructions, thank you for such a professional presentation. The stack of finished journals is so yummy!
January 15th, 2007 at 11:29 am
I’ve been a bookbinder for a long time, and I have to say this is one of the clearest, best illustrated explanations of this process I have ever seen anywhere! Bravo!! And thanks for your generosity in sharing your rebinding process with us all!
January 15th, 2007 at 10:16 am
You did a fabulous job of writing this up. It’s way better than some how to books I’ve seen. Not only is the information wonderfully helpful but it’s really attractive to look at too. It was really neat seeing the images with the stacks of already filled in journals too. What a treat!
January 15th, 2007 at 8:53 am
SO happy to have stumbled upon your blog via Moleskinerie…thanky ou so much for the detailed instructions, I am looking forward to trying this myself. Cheers!
January 15th, 2007 at 7:40 am
WOW – how Fabulous, I canot wait to get my supplies and get started, A Perfect January project.
Thank You So Much for your generous gift!!!
Sandy
January 15th, 2007 at 7:18 am
how GENEROUS of you to take the time to write such a detailed, instructive report! THANK YOU!
January 15th, 2007 at 4:54 am
I am staggered that you have managed to so completely describe this mysterious process – I am immediately inspired to try this out and will scoot off this morning to where I know they are selling off the daily planners at half price! Thank you so much for putting so much time and effort into this explanation and demo!
Jules
January 15th, 2007 at 12:43 am
Wow, I’m blown away, that is some serious dedication!